Related Link------------
My app publishes on Google play https://play.google.com/store/apps/details?id=appinventor.ai_test.FusionTableWizard
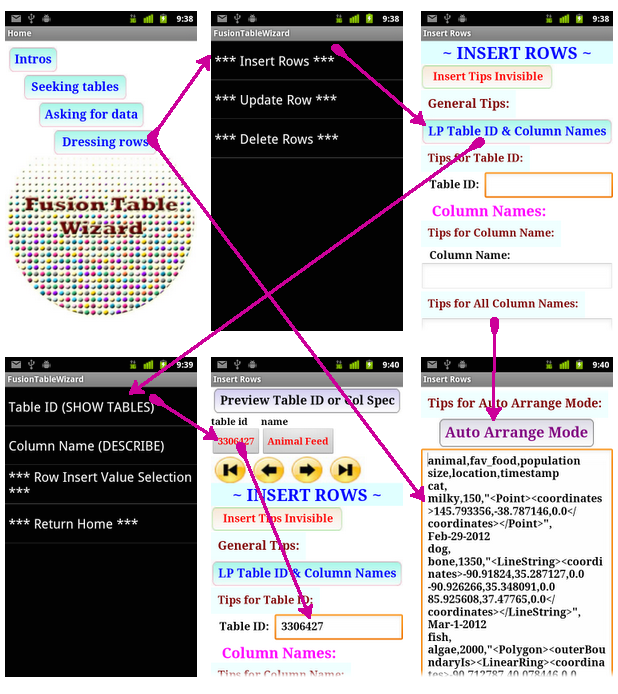
~ Dressing Row ~
1-1. General Tips:
1. Opening the List Picker 'LP Table ID & Column Names';
2. Obtaining Table ID using the same List Picker and the button 'Preview Table ID or Col Spec';

3. Consecutively obtaining all the Column Names using the button 'Preview Table ID or Col Spec';
4. Repeatedly choosing 'Value (Single Row)' in the List Picker 'LP Value' each time entering in the form each corresponding values in column names order;
5-1. Tapping the button 'INSERT ROWS' after choosing all the values in relation with single row;
5-2. If you want to insert multiple rows after choosing all the values in relation with single row, just choosing 'Multiple Rows' hidden-listed in 'LP Value' before tapping 'INSERT ROWS'

5-3. Repeating the above items 4 and 5-2; and
6. Tapping the button 'INSERT ROWS' after finishing them.
Note:
*** It should be noted that one of list pickers related to locations such as 'LP Location Point', 'LP Location Line' or 'LP Location Polygon' by choosing '*** Location Point ***', '*** Location Line ***' or '*** Location Polygon ***' hidden-listed in '*** Row Insert Value Selection ***' of the List Picker 'LP Value' should be used instead of 'LP Value' if column types in column names order are locations rather than number, string, or date/time. ***
1-2. Auto Arrange Mode:
1. If you have already prepared csv file, you can automagically arrange column names and row values by tapping the button 'Auto Arrange Mode' as shown below.
2. When you see the notifying message 'Please be informed that auto arrangement have been finished. Please tapping the button 'INSERT ROWS', just tapping it.
3. Please refer to 'Settings' in 'Intros' regarding the copy, paste and store it,
2. Upload Row
2-1. General Tips:
1. Opening the List Picker 'LP Table ID & Row ID';
2. Obtaining Table ID using the same List Picker and the button 'Preview Table ID or Col Spec';
3. Obtaining Row ID using the same List Picker and the button 'Preview Col Name & Values'; and
4. Updating row using the List Picker 'LP Value Update' and 'Preview Col Name & Values'.
*** If you want to update location data, open one of List Pickers such as 'LP Location Point', 'LP Location Line' and 'LP Location Polygon' using 'Row Update Value Selection' hidden-listed in any List Picker. ***
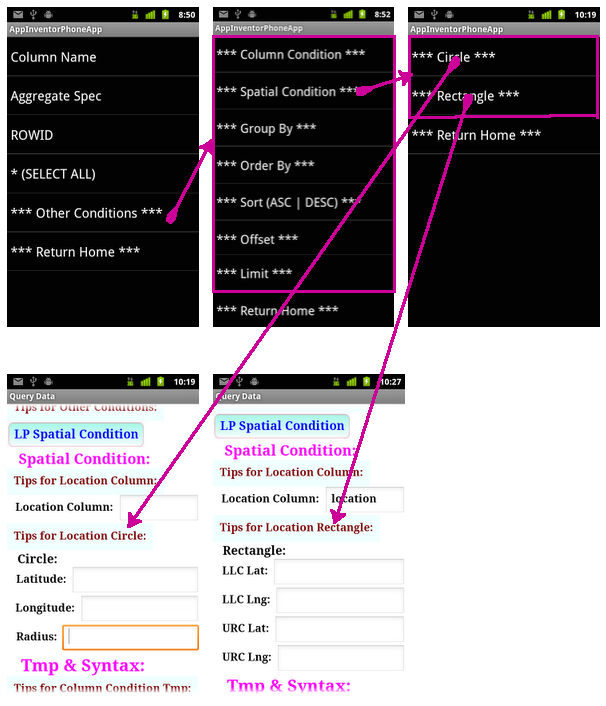
3-1. General Tps:
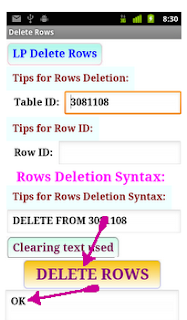
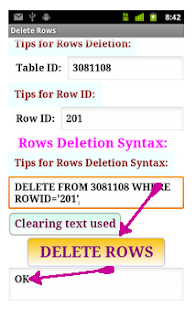
1. Opening the List Picker 'LP Delete Rows';
2. Obtaining Table ID using the same List Picker and the button 'Preview Table ID or Col Spec';
3-1. If you want to delete all the rows, tapping the button 'DELETE ROWS';
3-2. If you want to delete one row instead of all, obtaining Row ID using the same List Picker and the button 'Preview Table ID or Col Spec'; and
3-3. Tapping the button 'DELETE ROWS'.


